Create Export Profile
In this section we will explain how we can create an export profile, as well as get the most out of all secondary options that we can use in our profile setting.
We locate in the main tab "Export - Import". This tab is divided in 2 zones:
- Launch profile (Execute a profile).
- Create or edit Import/Export profile (Create or edit import and export profiles).
Creation of export profile
In the second zone we can create, edit or delete profiles. To create an export profile, we will follow the steps below:
- We press the green button "Export".
- We fill in the section "Export profile configuration" (Which is explained below) and more sections will appear.
Export profile configuration sections
Note: Of all the section that we will see, the only obligatory ones to fill in are the first and the last.
Note 2: Notably, depending of the type of element that we will export, some internal fields of these sections may change and even some sections may disappear, since they are not compatible with some elements we choose to export.
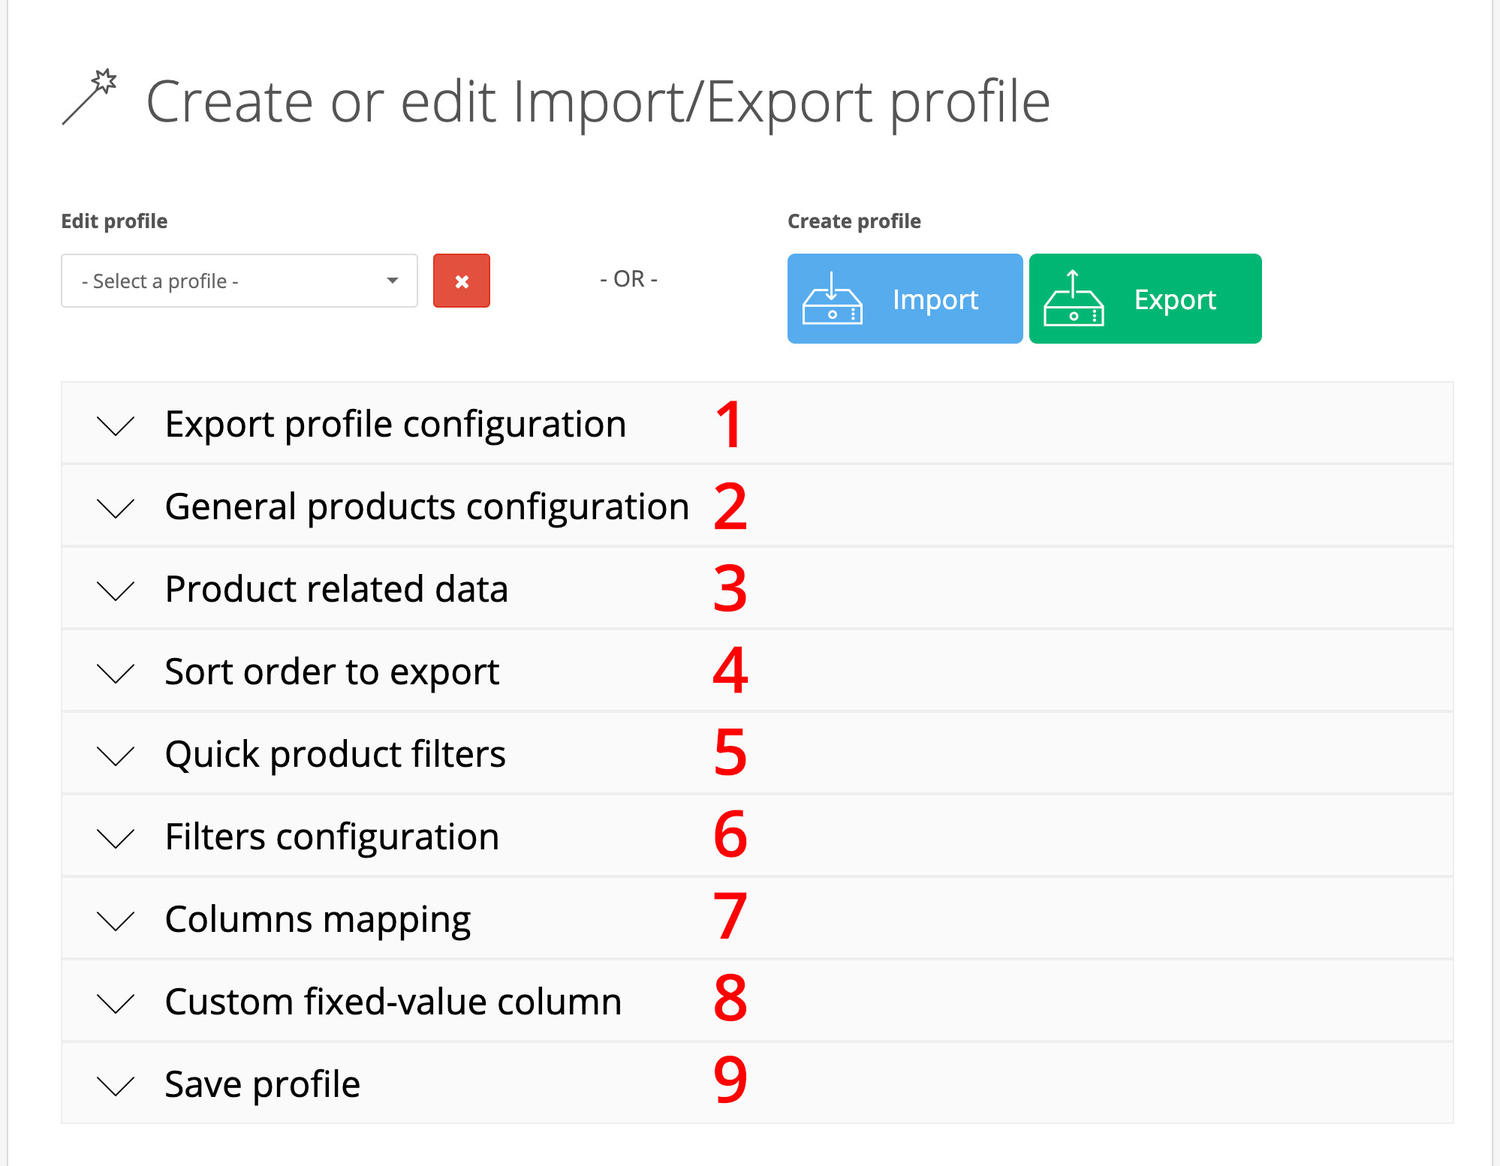
click in the follwing titles to know their information:
1.- Export profile configuration
Once this area is filled in, the other configuration sections will appear (2,3,4,5,6,7 and 8).
we must establish in this section:
- Format file.
- The file will be: Where the file will be exported.
- It will downloaded from our browser.
- It will be saved in our server.
- It will be saved in an external server.
- Elements: What elements we want to export: Products, categories, manufacturers...
2.- General products configuration
This section is only available if we are setting an export profile of "Products - (+product related data)"
Here we can define the following configuration:
- Multilanguage: If we enable this function, we will enable the multilanguage, this means that our profile will create new columns for all those that are multilanguage type, for example, the column "Name" it will become 2 "Name es-es" and "Name en-gb" (in case that we have 2 languages installed, and be the Spanish and the English).
- Category tree : If we enable this function the profile will transform the category columns by default "Cat. 1", "Cat. 2", "Cat. 3", in compatible columns with the category tree "Cat. tree 1 parent", "Cat. tree 1 level 1", "Cat. tree 1 level 2"...
- Add tax to prices : If we enable this function the price of the products will be exported with the taxes included.
- Subtract tax from prices : if we enable this function the price of the products will be exported with the reduced taxes.
3.- Product related data
This section is only available if we are setting an export profile of "Products - (+product related data)")
We will establish from this section the number of columns of related product data like: Number of categories, number of secondary images, number of attributes, etc...
Once we establish data in this section, our columns map will change, we can find the columns map in the section "Columns mapping", which we will explain later.
4.- Sort order to export
We can establish from this section the order that will have our export file, by selecting which column will be ordered and the sort order (ascending or descending).
5.- Quick products filters
This section is only available if we are setting an export profile of "Products - (+product related data)"
We can establish in this section the categories and manufacturers whose products will be exported, over the time we will be adding more filters to this section.
6.- Filters configuration.
We can establish from this section advanced filters for our export, we can establish practically all the filters that come to our mind, for this we press the blue button with the symbol "+" to add the first filter, a new row will appear in the table which contains the following values:
- Field: Selector where we will select the field to filter.
- Condition: Selector where we will select the condition (lower than, greater than, contains, does not contain, etc...)
- Value: Field of text where we can insert the value to filter.
We can add more filters by pressing the previously mentioned button.
In the footer of the table we see a new selector "Set main conditional to your filters", with the options "AND" or "OR", with this selector we will say what condition will appear in the union of our conditions:
AND -> (Condition 1) AND (Condition 2) AND (Condition 3)
OR -> (Condition 1) OR (Condition 2) OR (Condition 3)
7.- Columns mapping
You can find more information about this section in "Columns mapping".
8.- Custom fixed-value columns
You can add from this section as many columns as you need, this can be useful if you need to export your products to an external platform, and this requires a column that it is not possible to export with the default options (For example, a "Currency" column,we can create a column called "Currency" whose value is "EUR").
To create a column we will press the blue button with the symbol of "+" and a new row will appear with the following fields:
- Column name: The name of the column.
- *Column value: the value of the column. (More information below)
- Sort order: The order of the column (0 for the first position).
Column value:we can establish the following types of value of this column:
- Literal: As we saw in the example of "EUR" all the columns will have this value.
- Column value: If we put the name of a column in square brackets, which is present in our file, this new column will contain the value of that column: [Price] [Cat. 1]...
- Columns value with numeric expression: We can also perform mathematical operations for columns values (for numeric columns obviously) examples:
- [Price]*0.81 -> Will multiply what the "Price" column worth per 0.81.
- [Price]/0.81 -> Will divide what the column "Price" worth between 0.81.
- [Price]+0.81 -> Will add 0.81 to the value that the "Price" column contains.
- [Price]-0.81 -> Will substract 0.81 to the value that the "Price" column contains.
- [Price]%0.81 -> Will calculate the rest of the the division that the "Price" column contains between 0.81.