Configuration of CRON Jobs
In this tutorial we will see how to configure CRON Jobs for previously created feeds
Part One - Configuration of CRON
Important Note: As we saw in previous sections, we can only create CRON Jobs for feeds whose configuration is "Save to my server" or "Saved into external server" ("File configuration" zone).
As we saw in the "Get feed URL" section, click on the "HERE" link in the second blue information box of the "Feed" tab.
A popup will appear with the information of our feeds and a summary with colors to configure CRON Jobs on our server. For our example we have created two feeds.
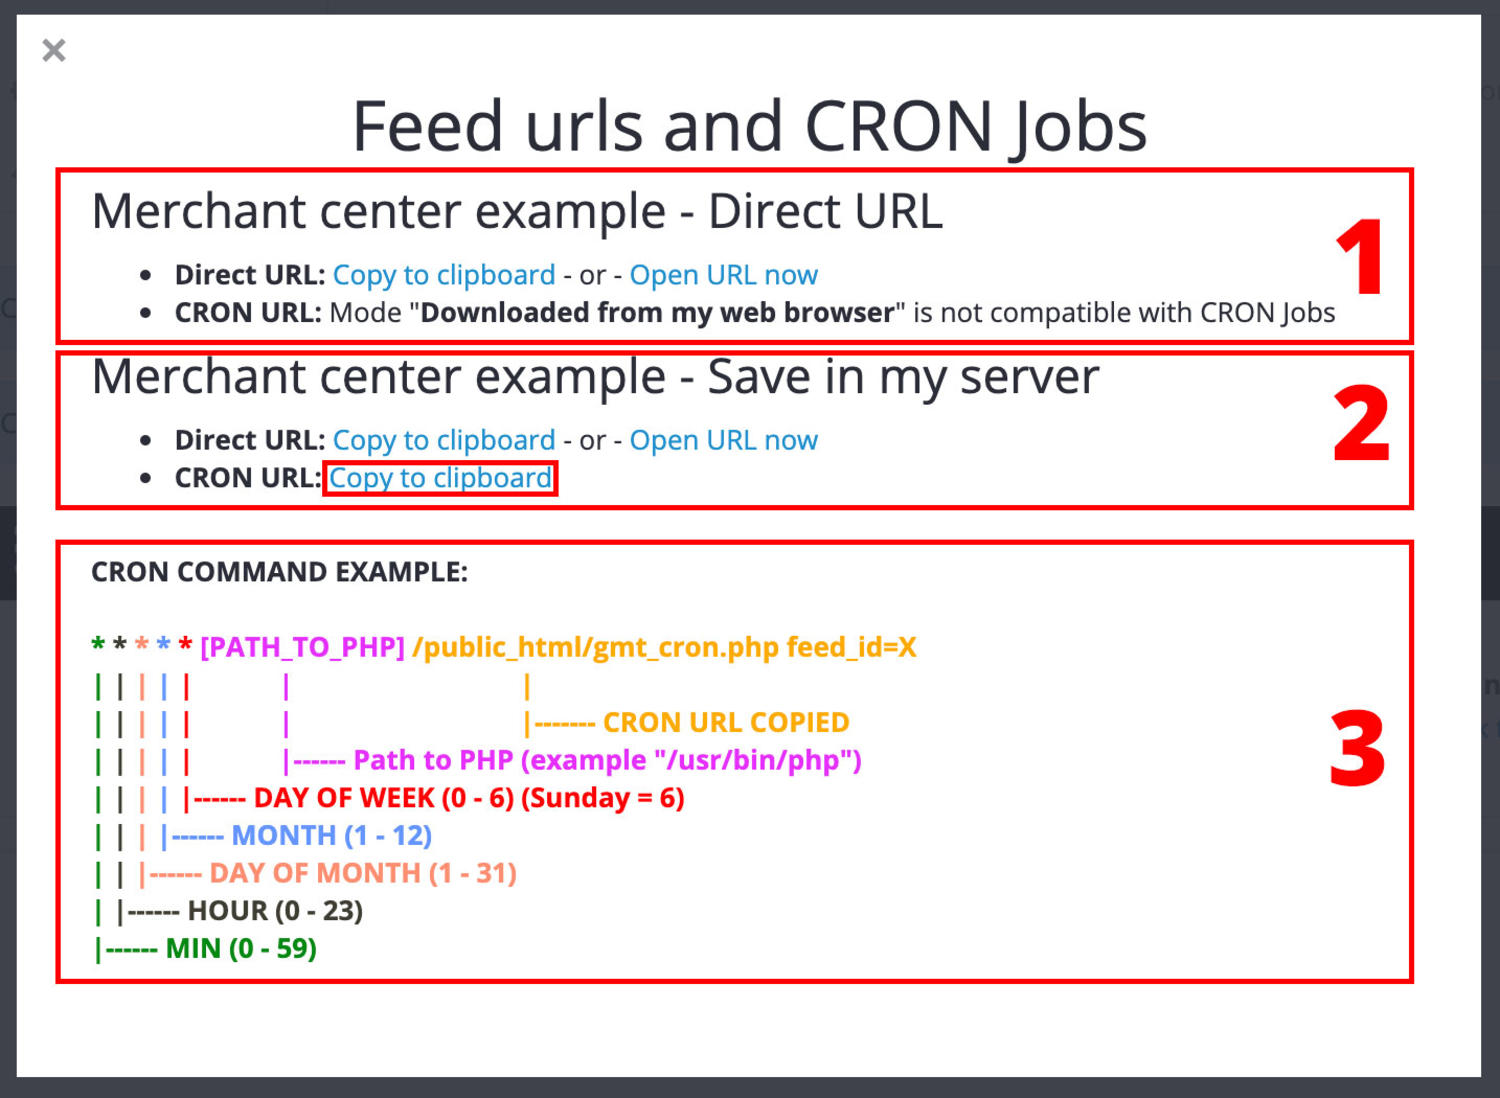
Point one: This configuration is not compatible to use it through CRON Jobs, since the output type of this feed is "Download from my web browser" (Download from my computer). This point is used for the "Get feed URL" page that can be found in this documentation.
Point two: We click on "Copy to clipboard" (copy to clipboard) to copy the path to the php file that will launch our feed generation process, this route will be part of our CRON command.
Point three: This point explains the command that we must execute on our server to create the CRON Job.
Before continuing we must know the route where PHP is installed on our server, depending on the type of server you are using, this route may vary, but most commonly it is at one of the following directory: "/ usr / bin / php", "/ usr / local / bin / php "," / usr / local / cpanel / 3rdparty / bin / php ".
To know the PHP route, you can create a phpinfo.php file, and search for "PHPBIN", if you do not find it you can contact your technical hosting support and they will be able to help you locate this information.
Once the php route is known, we can configure our CRON Job. Unfortunately the CRON Jobs are not all configured the same in all hosting, there are always some differences, what we have to take into account is the division of the CRON command, since in some hosting these divisions are configured differently.
* * * * * [PATH_TO_PHP] [PATH_TO_PHP_FILE]
Division One -> * * * * *: As we can see in the capture, here we will establish the frequency with which our CRON Job will be executed, some hosting allow us to configure the frequency through selectors (Days of the week - Select: 1,2,3,4,5,6,7) . Let's see some examples:
0 0 * * * -> It will run every day of the year at 00:00
0 0 * * 0,2,5 -> It will run every Monday, Wednesday and Saturday of the year at 00:00
0 0 1 1 * -> It will run every January 1 at 00:00
Division Two -> [PATH_TO_PHP]: The PHP route that we explained earlier.
Division Three -> [PATH_TO_PHP_FILE]: The path and parameters to the PHP file that will launch our feed generation process, as we saw in "Point Two" can be obtained by clicking on "Copy to clipboard"
A COMPLETE EXAMPLE OF COMANDO CRON: 0 0 * * * /usr/bin/php /var/public_html/myshop.com/catalog/controller/extension/module/gmt_cron.php feed_id=1
Part Two - Get generated file URL
We already saw in part one how to configure the CRON Job, this automatic process will generate a file in our server (or in an external one, depending on the output mode of the feed that we chose) that contains all the data about our products.
We have to know what the direct URL to that file is to establish it in our market configuration. Let's see some examples:
Note: As examples, we established the name of the file previously "products_feed", our store is myshop.com and an external server is myexternalserver.com
- Output format "Save to my server": /var/public/myshop.com/
- URL: https://myshop.com/products_feed.xml
- Output format "Save to my server": /var/public/myshop.com/feeds/
- URL: https://myshop.com/feeds/products_feed.xml
- Output format "Save to external server": /home/feeds/
- URL: https://myexternalserver.com/feeds/products_feed.xml